CentOS vncserver以及桌面环境的安装与配置
VNC简单介绍
VNC,全称为Virtual Network Computing,它是一个桌面共享系统。它的功能,类似于windows中的远程桌面功能。VNC使用了 RFB(RemoteFrameBuffer,远程帧缓冲)协议来实现远程控制另外一台计算机。它把键盘、鼠标动作发送到远程计算机,并把远程计算机的屏幕发回到本地。VNC技术与平台无关,VNC Viewer可以和VNCServer在不同的操作系统上。VNC几乎支持所有的操作系统,也支持Java,甚至可以通过支持Java的浏览器来访问 VNCServer。多个VNC客户端可以同时连接到一个VNC Server上。VNC最初由AT&T开发的,它的源代码是开源的。
在CentOS上安装VNC和VNCserver
查看是否安装了VNC以及VNCserver
[root@btland ~]# rpm -q vnc vnc-server
vnc-4.1.2-14.el5_6.6
vnc-server-4.1.2-14.el5_6.6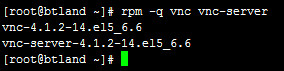
如果没有安装,则安装他们
[root@btland ~]# yum install vnc vnc-server -yCentOS 6使用
[root@btland ~]# yum install tigervnc tigervnc-server -yUbuntu的话,就是执行
[root@btland ~]# apt-get install vnc vnc-server如果提示"No package tigervnc available"先使用
yum search vnc搜索相关的包
[root@btland ~]# yum search vnc
Loaded plugins: fastestmirror
Loading mirror speeds from cached hostfile
=============================== N/S Matched: vnc ===============================
gtk-vnc.i386 : A GTK widget for VNC clients
gtk-vnc-devel.i386 : Libraries, includes, etc. to compile with the gtk-vnc
                   : library
gtk-vnc-python.i386 : Python bindings for the gtk-vnc library
vnc-server.i386 : A VNC server.
xorg-x11-server-Xvnc-source.i386 : Xserver source code required to build VNC
                                 : server (Xvnc)
tsclient.i386 : Client for VNC and Windows Terminal Server
vnc.i386 : A remote display system.
Name and summary matches only, use “search all” for everything.然后再yum install安装
修改vnc桌面尺寸
编辑/etc/sysconfig/vncservers
添加
VNCSERVERS=”0:root”
VNCSERVERARGS[0]=”-geometry 800x600”
这个桌面号是0,用户root,图形界面,尺寸800x600
启动VNC服务
使用vncserver命令启动VNC服务,命令格式为"vncserver :桌面号",其中“桌面号”用“数字”的方式表示
启动编号为1的桌面示例如下
[root@btland ~]# vncserver :1
You will require a password to access your desktops.
Password:
Verify:
xauth:  creating new authority file /root/.Xauthority
New ‘btland:1 (root)’ desktop is btland:1
Creating default startup script. /root/.vnc/xstartup
Starting applications specified in /root/.vnc/xstartup
Log file is /root/.vnc/btland:1.log
以上命令执行的过程中,因为是第一次执行,需要输入密码,这个密码被加密保存在用户主目录下的.vnc子目录(/root/.vnc/passwd)中;同时在用户主目录下的.vnc子目录中为用户自动建立xstartup配置文件(/root/.vnc/xstartup),在每次启动VNC服务时,都会读取该文件中的配置信息。
PS:/root/.vnc/目录下还有一个 .pid 文件,这个文件记录着启动VNC后对应后天操作系统的进程号,用于停止VNC服务时准确定位进程号。
VNC服务使用的端口号与桌面号的关系
VNC服务使用的端口号与桌面号相关,VNC使用TCP端口从5900开始,对应关系如下
桌面号为“1”,端口号为5901
桌面号为“2”,端口号为5902
桌面号为“3”,端口号为5903
……
基于Java的VNC客户程序Web服务TCP端口从5800开始,也是与桌面号相关,对应关系如下
桌面号为“1”,端口号为5801
桌面号为“2”,端口号为5802
桌面号为“3”,端口号为5803
……
基于上面的介绍,如果Linux开启了防火墙功能,就需要手工开启相应的端口,以开启桌面号为“1”相应的端口为例,命令如下
[root@btland ~]# iptables -I INPUT -p tcp —dport 5901 -j ACCEPT
[root@btland ~]# iptables -I INPUT -p tcp —dport 5801 -j ACCEPT
安装VNC图形桌面环境为GNOME或KDE桌面环境
CentOS安装是使用 Linux Text 模式安装没有安装X WindowSystem界面,现在要使用,使用yum安装。
安装X WindowSystem界面
yum groupinstall ‘X Window System’ -y安装GNOME桌面环境
yum groupinstall ‘GNOME Desktop Environment’ -yCentOS 6使用
yum groupinstall ‘Desktop’ -y安装KDE桌面环境
yum groupinstall ‘KDE (K Desktop Environment)’ -yCentOS 6使用
yum groupinstall ‘KDE Desktop’ -y卸载GNOME桌面环境
yum groupremove “GNOME Desktop Environment” -yCentOS 6使用
yum groupremove “Desktop” -y卸载KDE桌面环境
yum groupremove “KDE (K Desktop Environment)” -yCentOS 6使用
yum groupremove “KDE Desktop” -y配置VNC图形桌面环境为GNOME或KDE桌面环境
#!/bin/sh
Uncomment the following two lines for normal desktop:
unset SESSION_MANAGER
exec /etc/X11/xinit/xinitrc
[ -x /etc/vnc/xstartup ] && exec /etc/vnc/xstartup
[ -r $HOME/.Xresources ] && xrdb $HOME/.Xresources
xsetroot -solid grey
vncconfig -iconic &
xterm -geometry 80x24+10+10 -ls -title “$VNCDESKTOP Desktop” &
twm &将这个xstartup文件的最后一行修改为gnome-session &,再重新启动vncserver服务后就可以登陆到GNOME桌面环境
将这个xstartup文件的最后一行修改为startkde &,再重新启动vncserver服务后就可以登陆到KDE桌面环境
重新启动vncserver桌面的方法
[root@btland ~]# vncserver -kill :1
[root@btland ~]# vncserver :1
配置多个桌面
可以使用如下的方法启动多个桌面的VNC
[root@btland ~]# vncserver :1
[root@btland ~]# vncserver :2
[root@btland ~]# vncserver :3
……
但是这种手工启动的方法在服务器重新启动之后将失效,因此,下面介绍如何让系统自动管理多个桌面的VNC,方法是将需要自动管理的信息添加到/etc/sysconfig/vncservers配置文件中,先以桌面1为root用户桌面2为user用户为例进行配置如下:
格式为:VNCSERVERS="桌面号:使用的用户名 桌面号:使用的用户名"
[root@btland ~]# vi /etc/sysconfig/vncservers
VNCSERVERS=”1:root 2:user”
VNCSERVERARGS[1]=”-geometry 1024x768”
VNCSERVERARGS[2]=”-geometry 1024x768”
修改VNC访问的密码
使用命令vncpasswd对不同用户的VNC的密码进行修改,一定要注意,如果配置了不同用户的VNC需要分别到各自用户中进行修改,例如在我的这个实验中,root用户和oracle用户需要分别修改,修改过程如下:
[root@btland ~]# vncpasswd
Password:
Verify:
[root@btland ~]#
启动和停止VNC服务
1)启动VNC服务命令
[root@btland ~]# /etc/init.d/vncserver start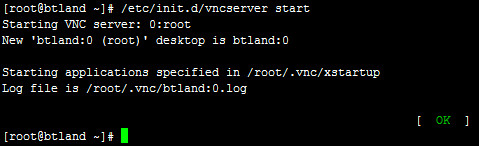
也可以
[root@btland ~]# service vncserver start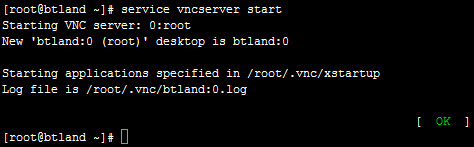
2)停止VNC服务命令
[root@btland ~]# /etc/init.d/vncserver stop 
也可以
[root@btland ~]# service vncserver stop
3)重新启动VNC服务命令
[root@btland ~]# /etc/init.d/vncserver restart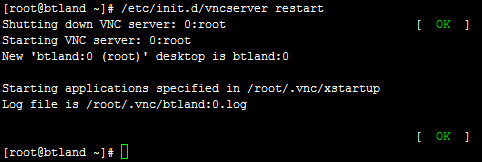
也可以
[root@btland ~]# service vncserver restart